Tuesday, June 14, 2011

Blender Intro - Part 6 - Pack & Append


Hi again.

Today i will "join" two of my previous works: SkyDome e Montanha Texturizada:


 First, here they are again:


- - -

No, i will show you a vídeo where i will focus two aspects:

Pack - Allow us to pack all the textures inside the blend file;

Append - Allow us to import anything from a blend file into another: objects, scripts, animations, etc...

In this post i will join the texturirez mountain to the skydome.

Here is the vídeo:


And the final file:


___________
prof-2004

Monday, June 13, 2011

Tutorial 2 - Making a SkyDome (Vídeo)


Hi.

For clear things out, ill show in realtime how you can create a sky on Blender.

Here is the Vídeo:


And, i share the blend file skydome.blend.

___________
prof-2004

Blender Intro - Part 5 - UvUnwrap


This time im going to apply textures in objects.

For this, i must talk about two different Blender Modes: Object Mode and Edit Mode.


We can use the TAB key to change from one to another.

Or by the following menu:


When we open Blender, we get in OBJECT mode, where we can: rotate, scale and move objets.

When we change into EDIT mode we gain acces to a new set of options:


Some of them are, the selection of faces, lines and vértices of the selected objects:


But, for now i only want to show you a new option in the following menu :


This option, MESH, only appears in this mode and allow us, between other stuff, to, apply textures in objects through the UVunwrap.

NOTE1: Repeat this in your Blender session:

EDIT MODE - Unwrap: Mesh>UVunwrap>Unwrap)

- - -

The window we are always using is the 3Dview:


When we use it, we get a small cube in its bottom left corner.

But, to apply textures we need another one, the UVview:


Here we get a all new set of options.

For now, just open any image you have in your pc:


Now, change back into 3Dview to see the result!

NOTE2: You also need to change to texturized objetcs:


;-)

Try it, practice makes perfection!

___________
prof-2004

Thursday, June 9, 2011

Blender Intro - Part 4 - Object Import


Hi

As you have seen before, we can create tridimensional sets using objects that already come with Blender.


But, these models are too simple and quite limited..

There are several sites that share 3D models, some for free, some for fee. There are models in different formats, the most common are *.3DS, *.OBJ, *.FBX and COLLADA (*.DAE)

Blender can use many of these formats, but its file type is *.BLEND, that can store models, cameras, lamps, animations, etc.

To use other objects in Blender, for instance, a *.3DS we ahve to import it:


NOTE: Dont forget the importance of the 3D Cursor.

Here i leave a *.3DS file so you can test it:


NOTE2: As you can see, the image of the cannon have several colors, that is called a texture. The 3D models i gave you dont have one. In the next posts i will write on the subject.

NOTE3: The original file is not mine, and can be found in the *.BLEND format, in a quite usefull site, full of 3D models, where its users, me included, share files with each other:

Its name is BLENDSWAP:

 
___________
prof-2004

Blender Intro - Part 3 - The 3D Cursor


Here it is another post about my introdution to Blender.

This time i will show how we can insert different objects into the 3D set.


You already saw in another posts, i used more than the original Cube. Blender comes with several objects we can use from the start:


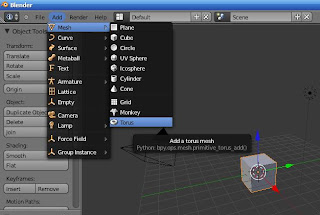
As you can see in the image above, throught the menu Add - Mesh, we gain access to more objects.

Now, if we just inset other objects, they all appear over each other in the 3D scene:


This is not good to see in a tridimensional scene.

An optimal scene must have objects with a good disctance over each other.

As you have see before, we can "grab" (G key) any object and move it in the 3D scene, but there is another option.

The 3D Cursor:


Any object we insert into the 3D scene appear in the place where this cursor is.
To place the cursor in another position just clic with the Left Mouse Button in another place.

Exercise:
Try inserting the different Blender objects in different places over the 3D set.

________
prof-2004

Tutorial 4 - Texturing the set


Hi again!

Today we will put to the test all what we learn from the previous post related to Uvunwrap - aplly textures into objects, in this case, a tex into the desert/montain 3D model i previous share in this blog.


First, the used text:


Second, the 3 D model, in collada (*.dae) to import into blender (file-import):


With all set in scene, change into the UVediting view, in it we get two windows:


Change to EDIT MODE, where we can see all the faces of the mountain, we should sellect them all - A Keyborad Key until all gets the orange border:


And we do the UVUnwrap:


In the left side window we also get all the faces fo the mountain.
Now, we get to open the image we want to apply:


If, in the right side window, in OBJECT MODE, we place blender se we could see the textures, we get to see the final result:


You can always give it a few tweaks, but i let you pratice yourself a bit ^_^

Voilá, this is the set where my paraSHOOTEr game will unfold!

___________
prof-2004

 
Design by Free WordPress Themes | Bloggerized by Lasantha - Premium Blogger Themes | Blogger Templates