Showing posts with label Blender Intro. Show all posts

Sunday, November 20, 2011

Blender Game Engine #02 - Dynamics


Demonstro um pouco mais sobre o blender game engine - dinamica:


Tuesday, June 14, 2011

Blender Intro - Part 6 - Pack & Append


Hi again.

Today i will "join" two of my previous works: SkyDome e Montanha Texturizada:


 First, here they are again:


- - -

No, i will show you a vídeo where i will focus two aspects:

Pack - Allow us to pack all the textures inside the blend file;

Append - Allow us to import anything from a blend file into another: objects, scripts, animations, etc...

In this post i will join the texturirez mountain to the skydome.

Here is the vídeo:


And the final file:


___________
prof-2004

Monday, June 13, 2011

Blender Intro - Part 5 - UvUnwrap


This time im going to apply textures in objects.

For this, i must talk about two different Blender Modes: Object Mode and Edit Mode.


We can use the TAB key to change from one to another.

Or by the following menu:


When we open Blender, we get in OBJECT mode, where we can: rotate, scale and move objets.

When we change into EDIT mode we gain acces to a new set of options:


Some of them are, the selection of faces, lines and vértices of the selected objects:


But, for now i only want to show you a new option in the following menu :


This option, MESH, only appears in this mode and allow us, between other stuff, to, apply textures in objects through the UVunwrap.

NOTE1: Repeat this in your Blender session:

EDIT MODE - Unwrap: Mesh>UVunwrap>Unwrap)

- - -

The window we are always using is the 3Dview:


When we use it, we get a small cube in its bottom left corner.

But, to apply textures we need another one, the UVview:


Here we get a all new set of options.

For now, just open any image you have in your pc:


Now, change back into 3Dview to see the result!

NOTE2: You also need to change to texturized objetcs:


;-)

Try it, practice makes perfection!

___________
prof-2004


Thursday, June 9, 2011

Blender Intro - Part 4 - Object Import


Hi

As you have seen before, we can create tridimensional sets using objects that already come with Blender.


But, these models are too simple and quite limited..

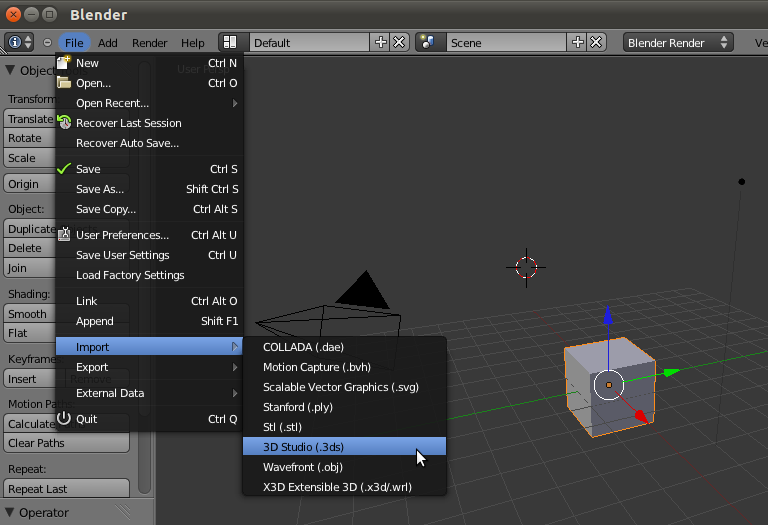
There are several sites that share 3D models, some for free, some for fee. There are models in different formats, the most common are *.3DS, *.OBJ, *.FBX and COLLADA (*.DAE)

Blender can use many of these formats, but its file type is *.BLEND, that can store models, cameras, lamps, animations, etc.

To use other objects in Blender, for instance, a *.3DS we ahve to import it:


NOTE: Dont forget the importance of the 3D Cursor.

Here i leave a *.3DS file so you can test it:


NOTE2: As you can see, the image of the cannon have several colors, that is called a texture. The 3D models i gave you dont have one. In the next posts i will write on the subject.

NOTE3: The original file is not mine, and can be found in the *.BLEND format, in a quite usefull site, full of 3D models, where its users, me included, share files with each other:

Its name is BLENDSWAP:

 
___________
prof-2004

Blender Intro - Part 3 - The 3D Cursor


Here it is another post about my introdution to Blender.

This time i will show how we can insert different objects into the 3D set.


You already saw in another posts, i used more than the original Cube. Blender comes with several objects we can use from the start:


As you can see in the image above, throught the menu Add - Mesh, we gain access to more objects.

Now, if we just inset other objects, they all appear over each other in the 3D scene:


This is not good to see in a tridimensional scene.

An optimal scene must have objects with a good disctance over each other.

As you have see before, we can "grab" (G key) any object and move it in the 3D scene, but there is another option.

The 3D Cursor:


Any object we insert into the 3D scene appear in the place where this cursor is.
To place the cursor in another position just clic with the Left Mouse Button in another place.

Exercise:
Try inserting the different Blender objects in different places over the 3D set.

________
prof-2004

Monday, May 23, 2011

Blender Intro - Part 2


Hi again,

This is the second part of the Blender Intro.


My last post ended with an exercise related with object movement throught the 3D scene using the G key ("grab")
__________

First i will go throught some important aspects from the last post:

The Blender initial 3D scene appears with 3 objects:
The Cam, the Lamp and the Cube;

Right Mouse Button - Object Sellection;

Orange Border - Sellected Object(s);

Red, Blue and Green Arrows - X, Y and Z axis;

Left Mouse Button - Drag and Move Objects throught the scene;

G key - Grab the Sellected Object(s);

G-X, G-Y e G-Z key combinations - Grab and Move Objects throught the desired Axis.

In this small resume we can see that Blender use and abuse of keyboard combinations, get use to it, it gets worse! hehe

;-)

In this post, i will try to explain new features in Blender:

R - Rotate objects;

R-X, R-Y e R-Z - Rotate objects throught a desired axis.


Another important button is the Mouse Wheel, when clicked allows:

-Zoom-in and Zoom-out in the 3D scene;

-When pressed+ Mouse movement allow us to change the prespective we see the 3D scene:


Try playing around a bit with this.

________
prof-2004

Wednesday, May 18, 2011

3D Models - Lansdscapes - Simple Landscape


Before i write the second part of my Blender Intro, i share with you guys a simple landscape that i created:


This landscape can be used as a desert or a mountain.

Here i left the *.blend file, as the original (collada *.dae).


________
prof-2004

Blender Intro - Part 1


Hi

Im prof-2004 and will introduce you to Blender.

As you could have seen in my last message, i recorded a video showing where you can get the lastest Blender build (2.57b), so go get it ^_^

Now, here goes the 'Introdution to Blender:


As you open Blender you get a picture like the above, showing the "the splash screen"!

With a small mouse clic you can take it out of the way, and we can start playing... er... er... cof... cof..., working ^_^

The initial scene is composed by three objects: a Camera, a Lamp and a Cube:


If you clic with your Right Mouse Button in the Cube, it gets an orange border, that means it is the sellected object. That is the way we sellect objects in Blender - RMB, dont forget it.

Exercise1: Try sellecting other objects and, why not sellecting more than one object at a time?

__________


As you sellect, for instance, the Lâmp:


You notice it gets the previous orange border and with three arrows nearby, a red, a green and a blue (each color/arrow matches one axis).

Blender is  a 3D application and so, it works in the x, y's and z axis.

To move an object through one of the axis, you can use those arrow. Just press and hold the Left Mouse Button over the desired one and move it:


Compare this image with the previous and look at the Lamp position. I moved it in the z axis!


Exercise2: Try moving the different objects throught the 3D scene, but this time dont use the arrows. This time use the keyboard shortcuts and grab:

g - z (z axis)
g - y (y axis)
g - x (x axis)

Other exercise: Simple use the g key and watch the result.

Practice makes perfection!

________
prof-2004

Ps: Here are some examples with the original positions of the objects: ex-aula1

 
Design by Free WordPress Themes | Bloggerized by Lasantha - Premium Blogger Themes | Blogger Templates